

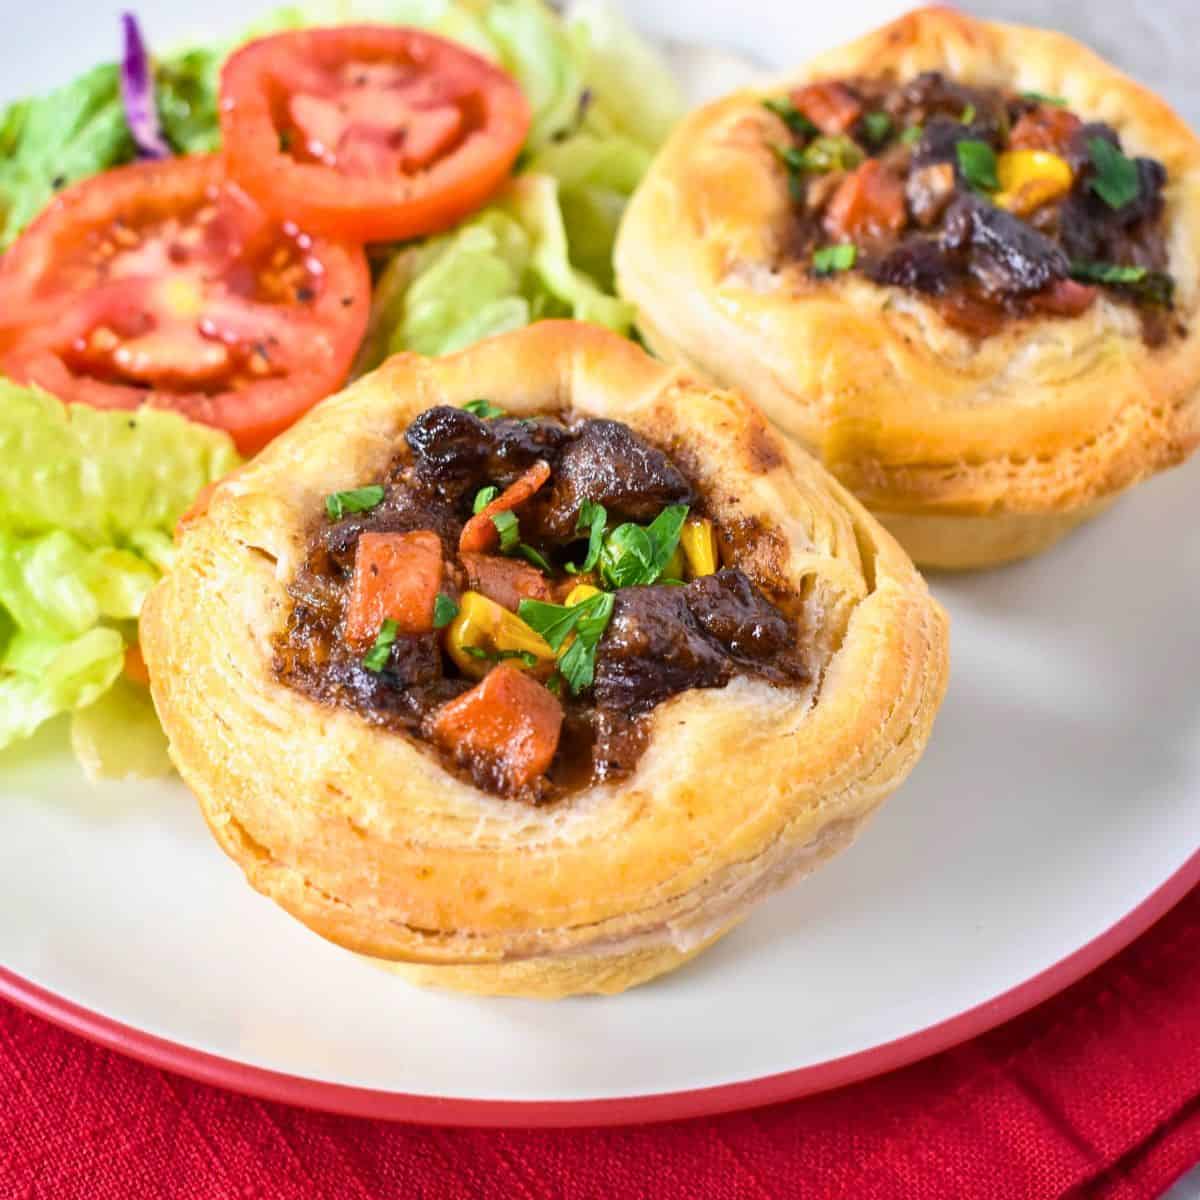
Mini beef pot pies are a quick and easy dinner idea with all the comfort of the classic. These individual pies are baked in muffin tins, made with refrigerated biscuit dough, and filled with a rich, savory beef mixture. Perfect for weeknights, parties, or lunch prep.
This site contains affiliate links to products. As an Amazon Associate I earn from qualifying purchases.
What's great about this recipe
- A fun twist on a classic - These hand-held pot pies are a great way to change up your usual dinner routine.
- Perfect for parties and gatherings - Hearty, easy to serve, and always a hit at casual get-togethers or game day spreads.
- Simple and budget-friendly - Made with affordable ingredients like sirloin tip, frozen vegetables, and refrigerated biscuit dough.
- Kid- and adult-approved - Savory, satisfying, and just the right size for picky eaters and hungry guests alike.
Ingredients

💌 Save this recipe
We'll send you occasional emails from Cook2eatwell. Unsubscribe anytime.
🫒 Oil - Use a light-tasting olive oil or a neutral oil like canola or vegetable.
🥩 Beef - Sirloin tip is a great choice for the filling because it's a tender cut that cooks quickly.
🧅 Vegetables - Fresh produce includes onion, celery, garlic, and parsley (for garnish). The rest come from a frozen vegetable mix with carrots, peas, corn, and green beans.
🧂 Pantry - You'll need beef broth, Worcestershire sauce, and all-purpose flour to thicken the filling.
🧈 Dairy and refrigerated - Butter is used with flour to make a simple roux that thickens the beef filling. Refrigerated biscuits form the crust for these mini pot pies, keeping things quick and easy.
🌿 Spices - Salt, black pepper, and Italian seasoning add extra flavor without much effort.
📖 See the recipe card for quantities and preparation methods.
You will also need
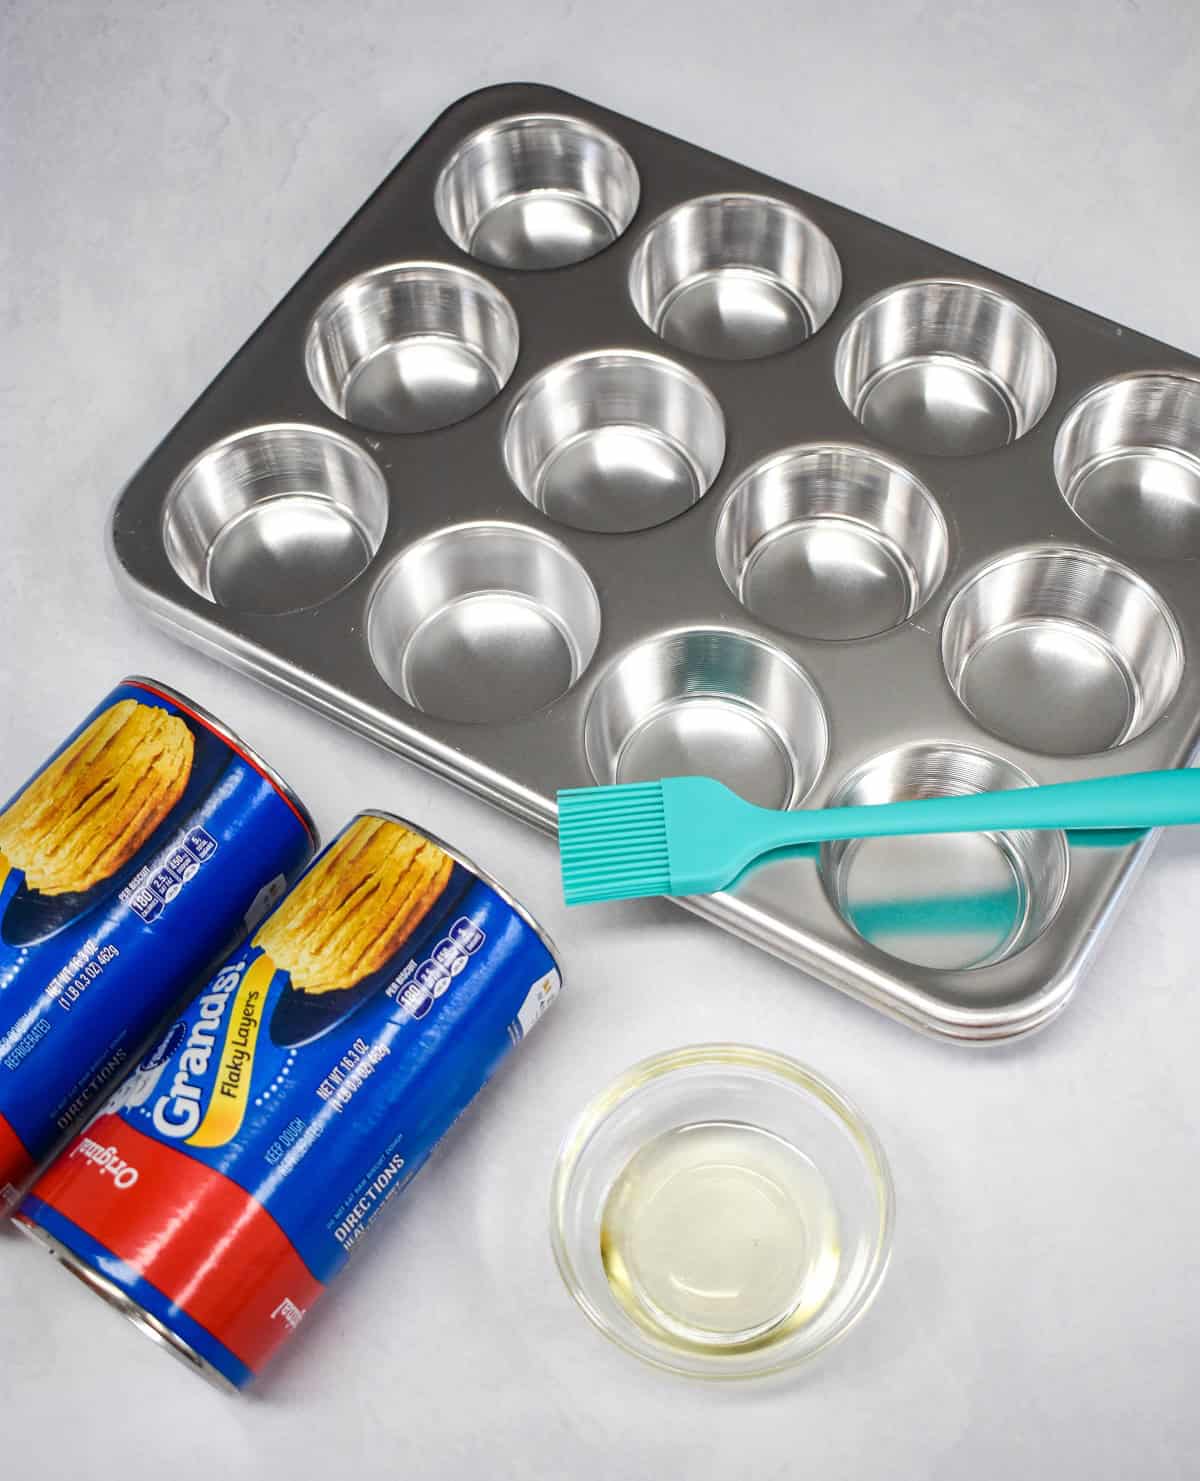
- 2 (12 cup) Muffin pans
- Oil or Cooking spray to grease the pan
- Pastry brush
How to make mini beef pot pies
Make the Filling
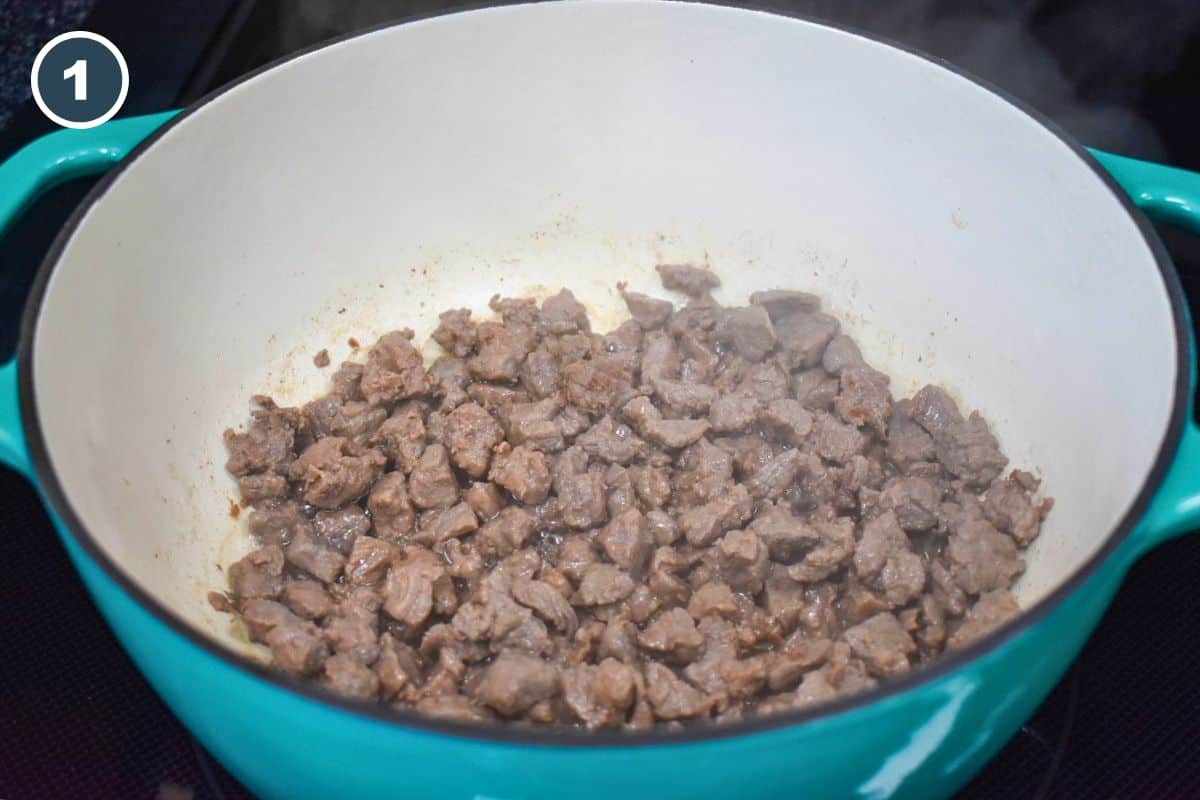
- Season the beef with 1 teaspoon of salt. Heat the oil in a large pot over medium-high heat. When hot but not smoking, add the beef. Cook for 4-6 minutes, stirring occasionally, until browned and any liquid has cooked out.
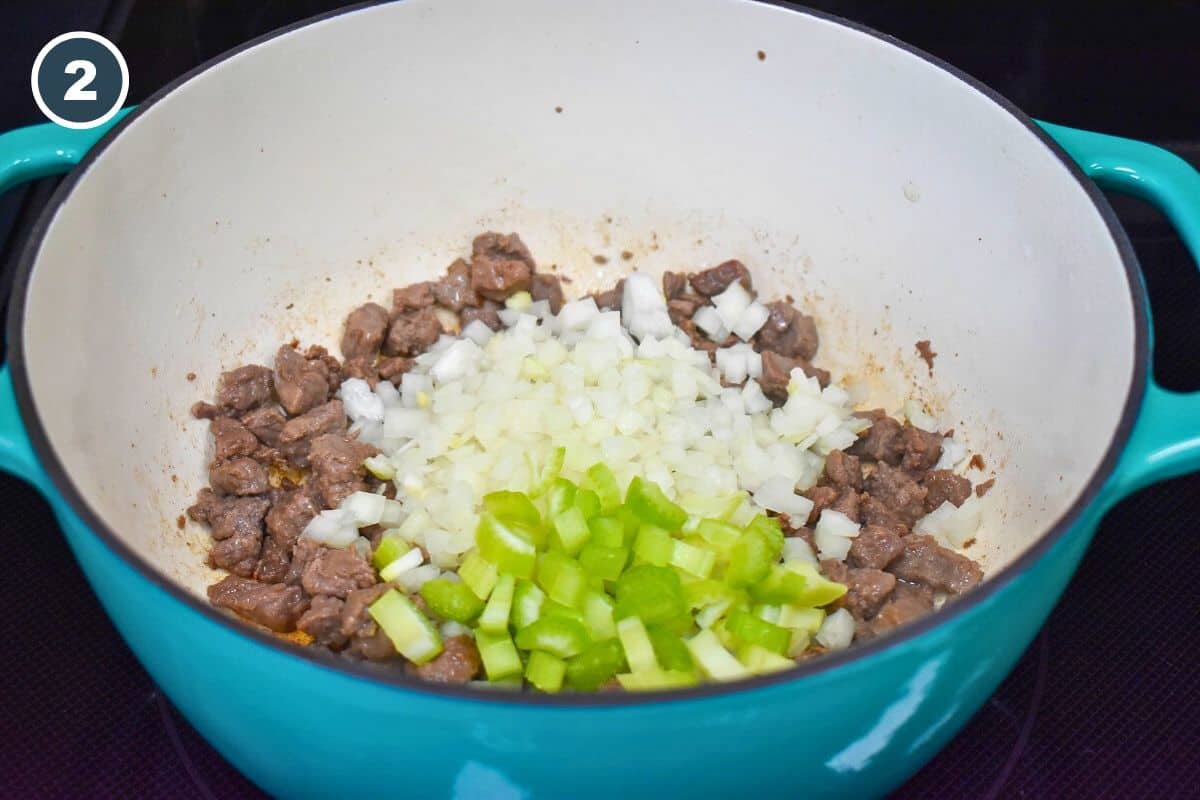
- Lower the heat to medium. Add the onions and celery; cook for 2-3 minutes, stirring frequently.
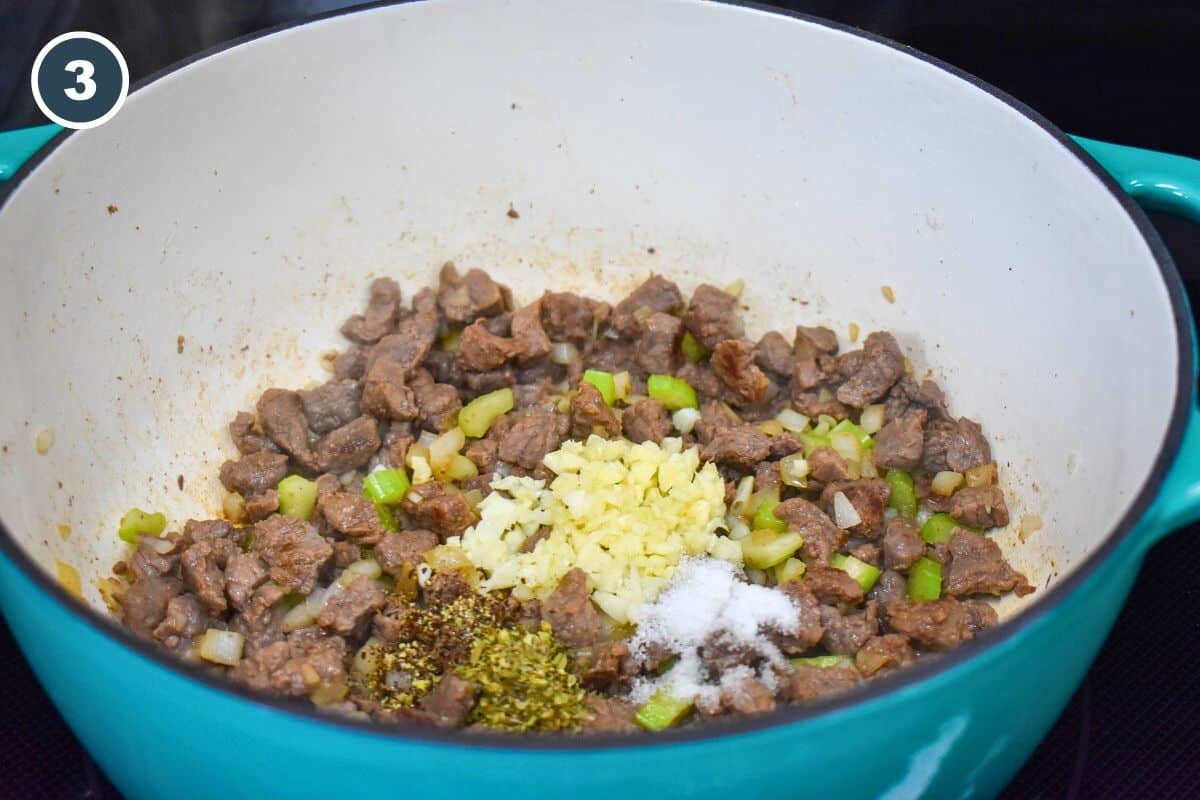
- Add the garlic, ½ teaspoon salt, Italian seasoning, black pepper, and Worcestershire sauce. Cook for 1-2 minutes, stirring often.

- Add the butter. Once melted, add the flour and cook for 1-2 minutes, stirring constantly.
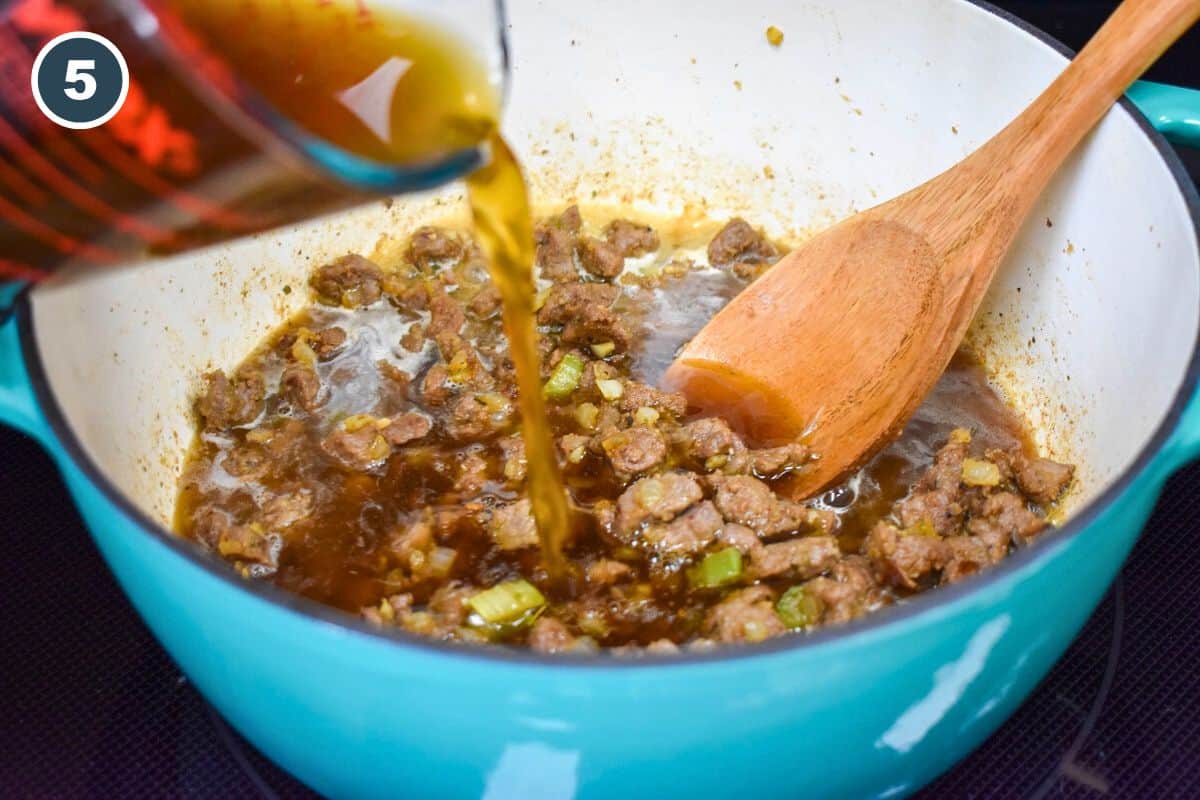
- Stir in the broth, gently scraping up any bits off the bottom of the pot. Bring to a boil-raise the heat if needed. Then reduce heat, cover, and simmer for 15 minutes, stirring occasionally. Adjust heat to maintain a gentle simmer.
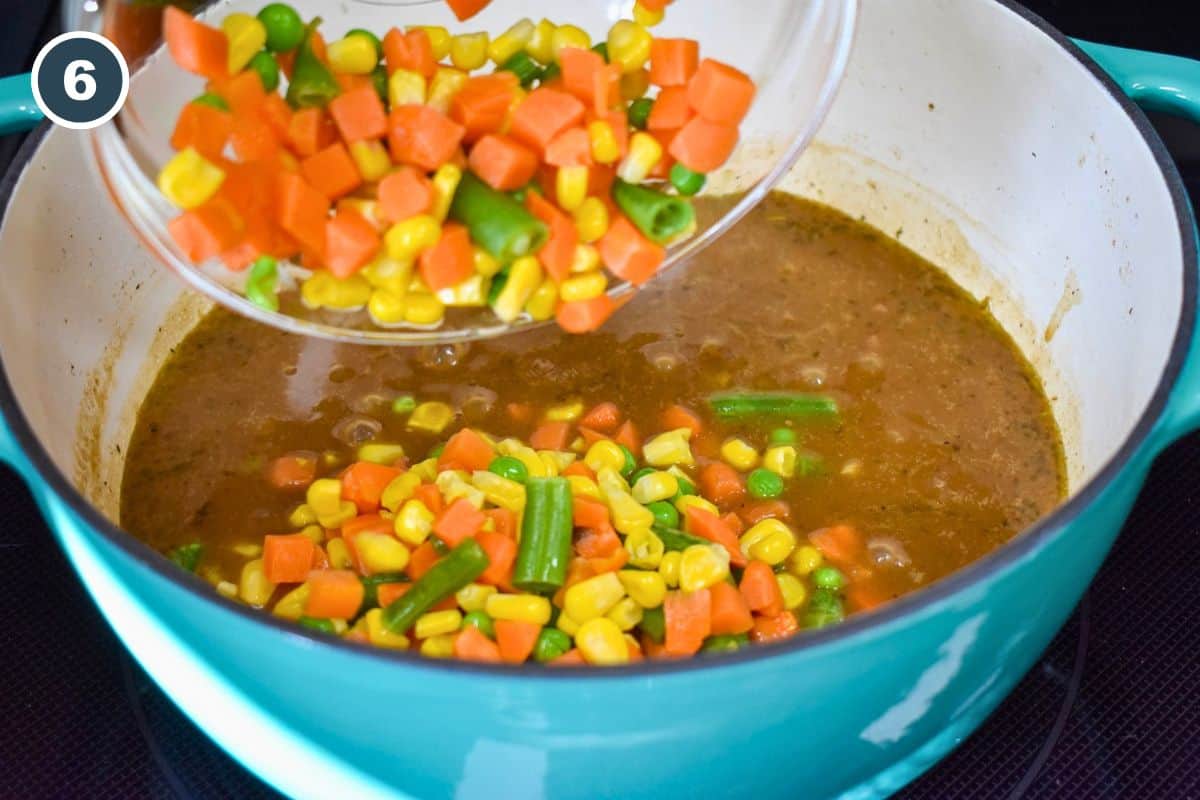
- While the beef simmers, cook the frozen vegetables just enough to defrost (do not overcook). Add to the pot, raise the heat to return to a boil, then reduce to medium or medium-low. Cook uncovered for 10-15 minutes, stirring often as it thickens.
Taste and add salt if needed. As a reference, we added ¼ teaspoon to ours.
Let the filling cool slightly; it will thicken more as it cools. Meanwhile, preheat the oven to 350°F.
Build the Pot Pies
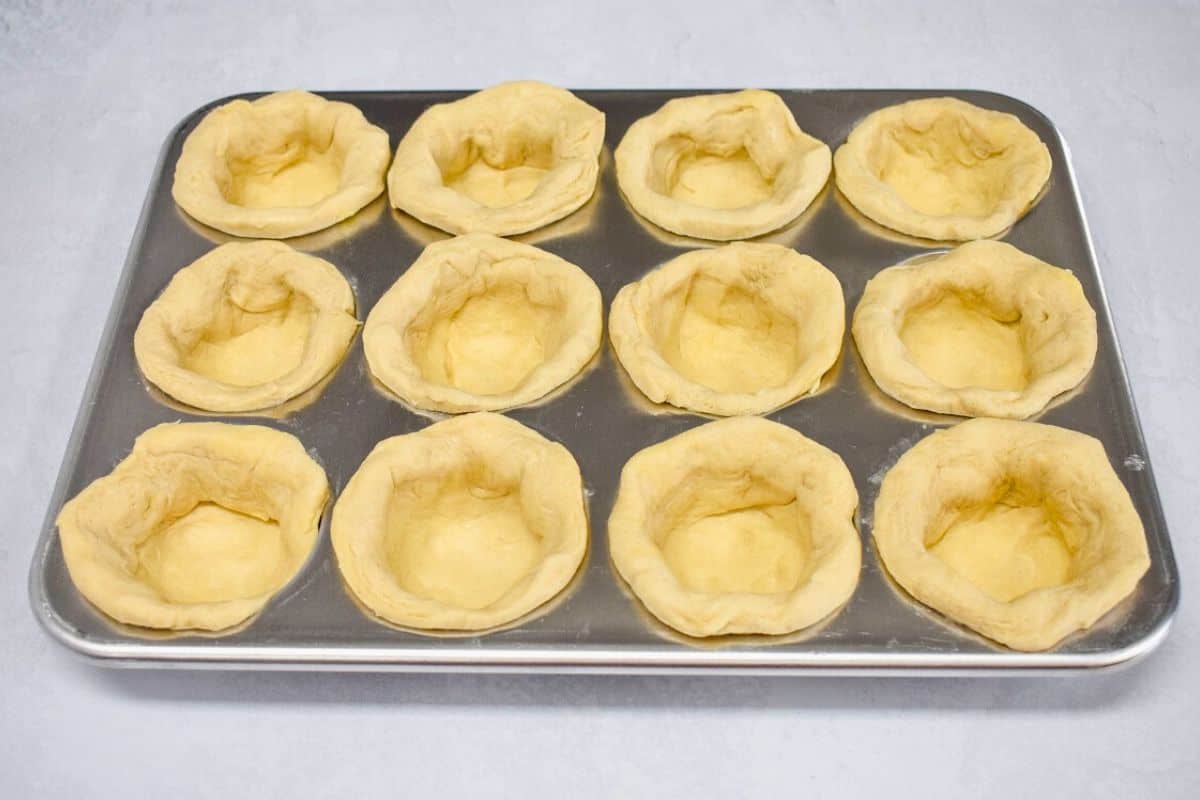
Lightly spray or oil two (12-cup) muffin pans. Dab away excess oil so it doesn't pool.
Open the biscuit package and separate the biscuits. Place one in each muffin cup and press gently to mold it along the bottom and sides.
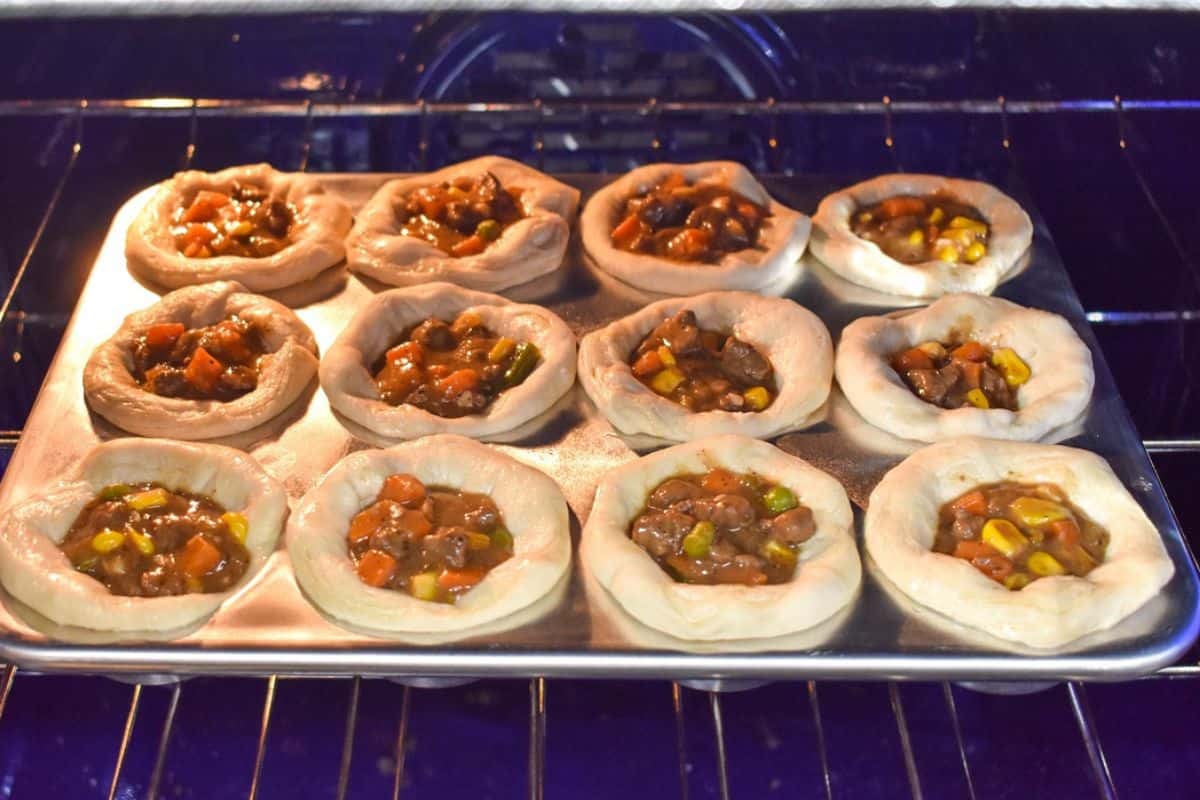
Continue pressing, even if the dough bounces back, until securely molded.
Repeat with remaining biscuits. Prick the bottoms and sides with a fork.
Fill each biscuit cup with 1-2 heaping tablespoons of filling. Bake for 20-30 minutes, until golden. Start checking at 20 minutes.
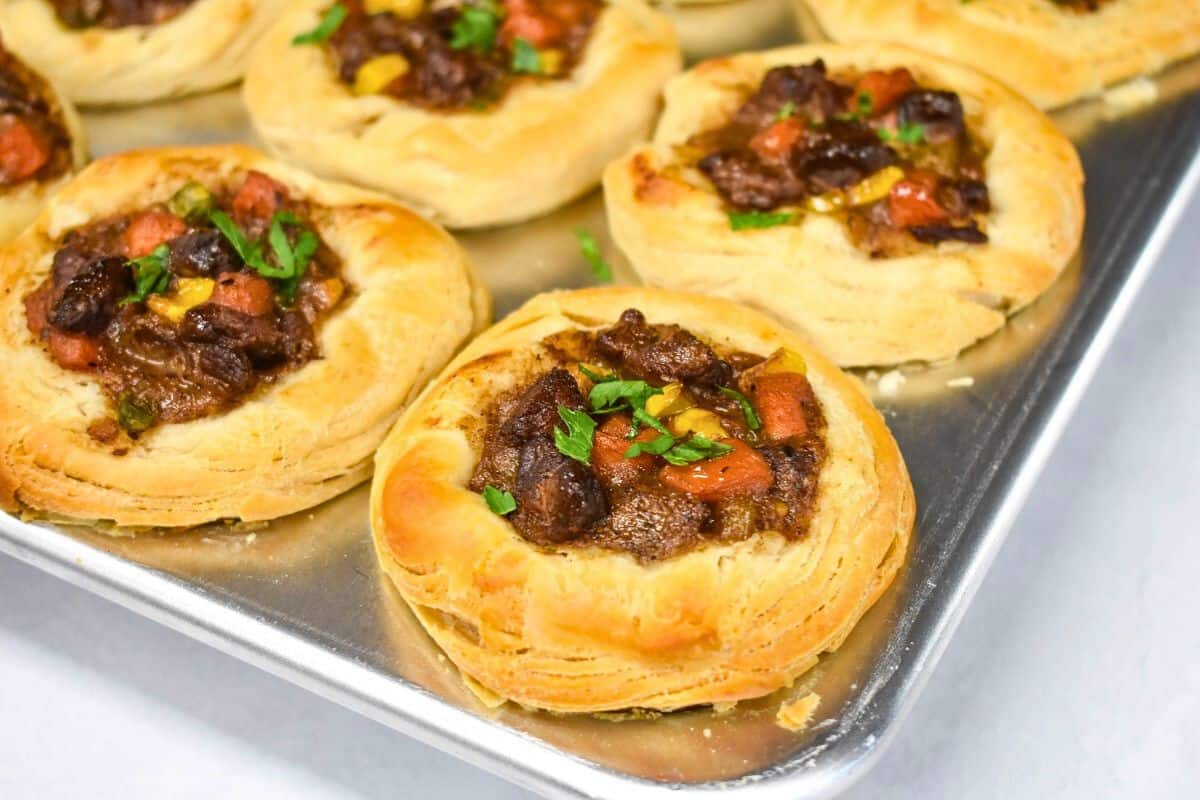
Use a plastic or silicone spatula to separate any biscuits that are touching. Garnish with chopped parsley, if desired.
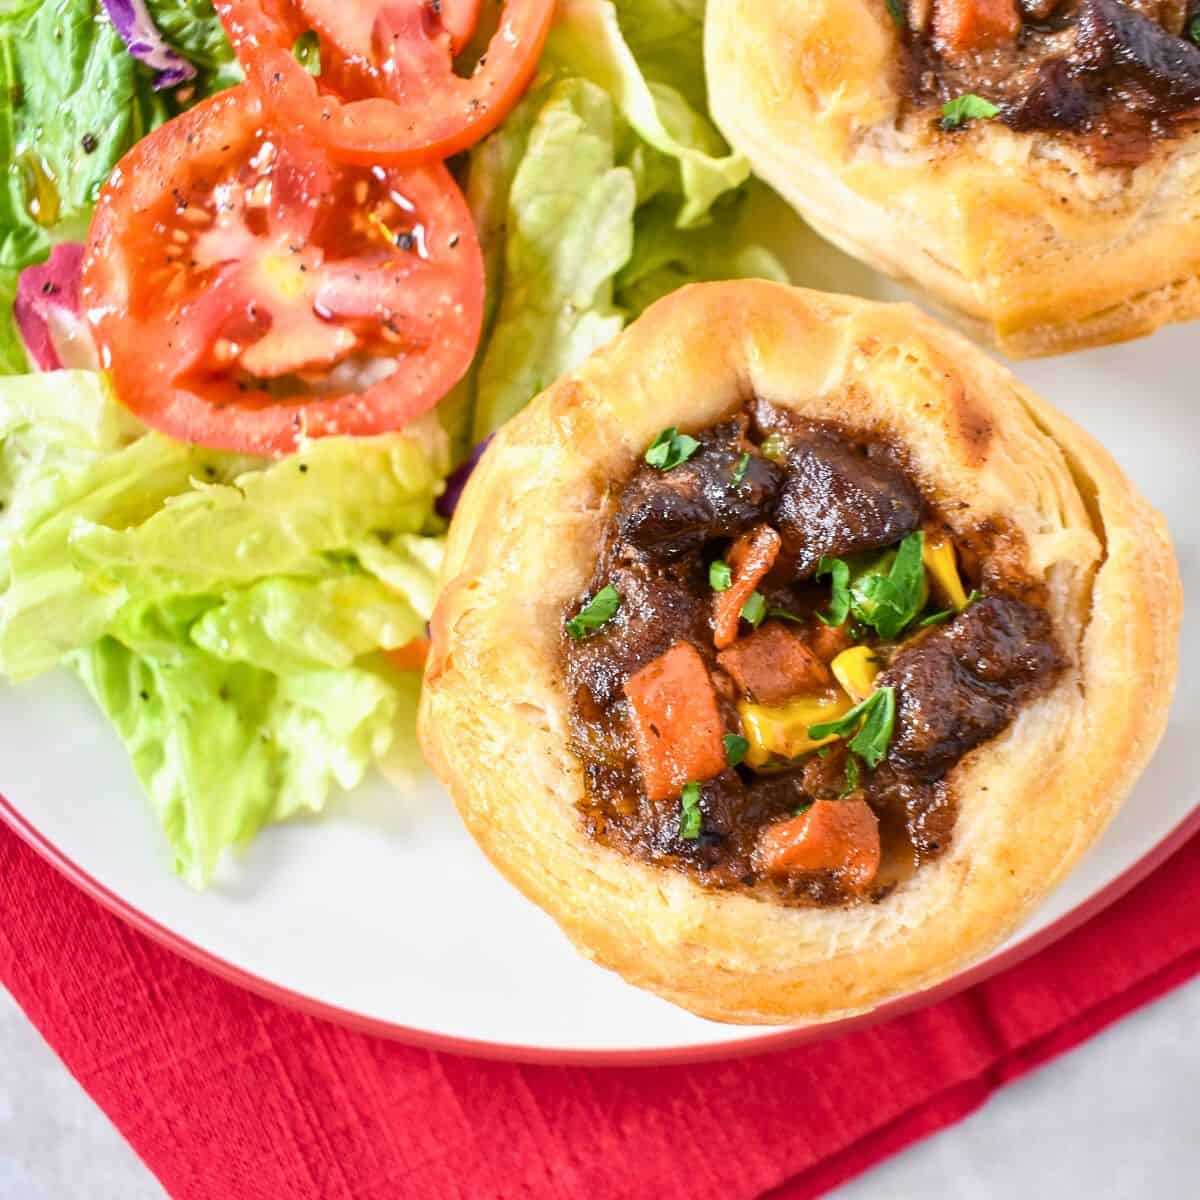
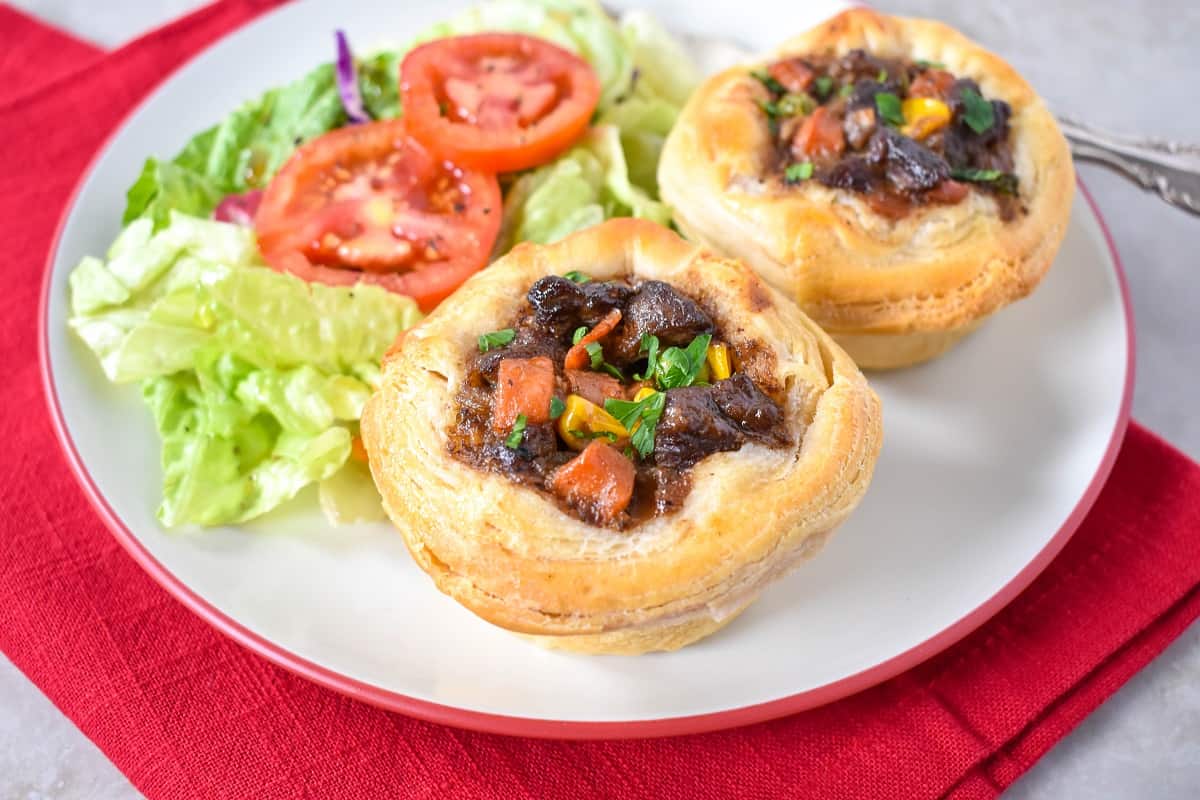
Carefully lift them out of the pan, arrange on a platter, and serve.
Recipe tips and notes
- Use reduced-sodium ingredients if you're sensitive to salt. Look for good-quality low-sodium broth and butter, and reduce the salt added to the beef if needed. Adjust the seasoning at the end if necessary.
- Cold biscuits are easier to work with. If the dough becomes sticky or hard to press into the muffin tin, pop it in the fridge for a few minutes to firm it up.
- Don't overfill the biscuit cups. Stick to 1-2 heaping tablespoons of filling per biscuit. Too much can cause the mixture to bubble over or prevent the dough from baking through in the center.
- Baking time may vary by pan type. Lighter-colored pans tend to bake more evenly, while darker pans may brown the bottoms faster. Start checking around the 20-minute mark.
- Let the filling cool slightly before assembly. A cooler filling thickens and is easier to scoop without making the biscuit dough soggy.
Substitutions and variations
Meat options - Sirloin tip is tender and quick-cooking, but other red meats like chuck or round can be used-just simmer longer until tender. You can also use ground beef for a faster option; brown it thoroughly and drain any excess grease before building the filling.
Vegetables - Stick to sturdy veggies that hold up well in the oven. Try frozen peas, peas and carrots, corn, or a mix of your favorites. If using canned vegetables, be sure to drain and rinse well to remove excess salt and starch.
Add-ins - Add a little tomato paste when cooking the aromatics for deeper flavor. A dash of hot sauce or crushed red pepper adds heat. You can also substitute soy sauce for Worcestershire in a pinch.
Make ahead, storing and reheating
Make ahead: The filling can be prepared ahead of time. Cook it as directed, then cool it quickly and store in an airtight container in the refrigerator for 1-2 days. Reheat in a saucepan over medium heat or in the microwave when ready to use. (Let it cool slightly again before assembling to keep the dough from getting soggy.)
Storing leftovers: Store leftovers in an airtight container in the refrigerator for 3-4 days. Make sure they are completely cool before storing.
Freezing: Freezing is not recommended for unbaked biscuit dough. Fully baked pies can be frozen once cooled. Wrap tightly and freeze for 1-2 months.
Reheating: Reheat in a 350°F oven until warmed through. To prevent the tops from over-browning, loosely cover with aluminum foil. You can also microwave individual portions, but the oven method gives the best texture. Always reheat leftovers to an internal temperature of 165°F for food safety.
Food safety: The USDA recommends that cooked food should not be left at room temperature for more than 2 hours, or more than 1 hour if the temperature is above 90°F. Leftovers should always be reheated to an internal temperature of 165°F. For more information on food storage and safety guidelines, visit the U.S. Department of Agriculture and foodsafety.gov.
Frequently asked questions
You can make the beef filling ahead and store it in the fridge, but it's best to assemble and bake the pies just before serving. The biscuit dough doesn't hold up well when left unbaked for long.
These mini pies are great on their own, but you can serve them with a green salad, coleslaw, or a dipping sauce like ranch or barbecue for a fun party spread.
Yes! Halve the ingredients and bake as usual. You can also freeze extra filling in an airtight container for up to 2 months to enjoy later.
If you enjoyed this recipe, try our mini chicken pot pies and pizza pot pies for more easy muffin tin meals. Want more fun dinner or party appetizer ideas? Check out our French bread pizza and stuffed biscuits-both are sure to please a crowd.
Join Us
Subscribe to our Newsletter to get the latest recipes, cooking tips, and kitchen inspiration delivered straight to your inbox. Don't forget to follow us on social media for daily recipe ideas and more!
📖 Recipe

Mini Beef Pot Pies Recipe
Ingredients
- 1 pound Sirloin Tip Beef cut into small pieces (about ½ inch)
- 1½ teaspoons Salt, divided (1 teaspoon for the beef, ½ teaspoon for the stew, plus extra at the end if needed)
- 1 tablespoon Oil use your favorite neutral oil with a high smoke point
- 1 Medium Onion small dice
- 1 Celery Rib sliced
- 3-4 Garlic Cloves minced
- ½ teaspoon Italian Seasoning
- ¼ teaspoon Fresh Ground Pepper
- 1 teaspoon Worcestershire Sauce
- 2 tablespoons Butter
- 3 tablespoons All-purpose Flour
- 2 cups Beef Broth
- 10 ounces Frozen Mixed Vegetables defrosted
- 2 (16 ounce) cans Refrigerated Biscuits (8-count each, 16 biscuits total)
- ½ tablespoon Chopped Parsley for garnish (optional)
Instructions
- You will also need: 2 (12-cup) Muffin Pans, Oil or Cooking Spray to grease the pan
Make the beef filling
- Season the beef with 1 teaspoon of salt.
- Heat the oil in a large pot over medium-high heat. When the oil is hot but not smoking, add the beef. Cook for 4-6 minutes, stirring occasionally, until browned and any liquid has cooked out.
- Lower the heat to medium. Add the onions and celery. Cook for 2-3 minutes, stirring frequently.
- Add the garlic, ½ teaspoon salt, Italian seasoning, black pepper, and Worcestershire sauce. Cook for 1-2 minutes, stirring often.
- Add the butter. Once it melts, add the flour. Cook, stirring, for 1-2 minutes to cook out the raw flour taste.
- Stir in the beef broth while gently scraping the bottom of the pot. Stir until the flour mixture dissolves.
- Bring the broth to a boil (raise the heat if needed). Then reduce the heat, cover, and simmer the beef mixture for 15 minutes, stirring occasionally.
- While the beef simmers, defrost the vegetables following package instructions, cutting the time. (We steamed ours in the bag for 3 minutes.)
- Add the vegetables to the pot and raise the heat to bring the broth back to a boil. Once boiling, reduce to medium or medium-low and cook, uncovered, for 10-15 minutes, stirring occasionally until the mixture thickens.
- Taste and add more salt if needed. (We added ¼ teaspoon to ours.)
- Let the beef filling cool. It will thicken more as it cools.
- Preheat the oven to 350°F.
Make the pot pies
- Lightly spray or oil the muffin pans. Dab away any excess oil so it doesn't pool at the bottom.
- Open the biscuit packages and separate the biscuits. Place one biscuit in each muffin cup and press gently to mold it along the bottom and sides.
- Continue molding and pressing until the dough is securely in place, even if it bounces back.
- Repeat with the remaining biscuits.
- Use a fork to prick the bottoms and sides of the biscuits a few times.
- Fill each biscuit cup with 1-2 heaping tablespoons of the beef filling.
- Bake for 20-30 minutes, or until the biscuits are golden. Baking time may vary depending on the type of muffin pan, so start checking at 20 minutes.
- Use a silicone or plastic spatula to separate any biscuits that are touching. Garnish with chopped parsley, if desired.
- Gently lift the pot pies out of the muffin pan, arrange on a plate or platter, and serve.
Notes
- Use reduced-sodium broth and butter if needed; adjust salt at the end.
- Cold biscuit dough is easier to work with-chill briefly if it gets sticky.
- Don't overfill the cups-1-2 heaping tablespoons of filling is just right.
- Lighter-colored pans bake more evenly; start checking at 20 minutes.
- Let the filling cool before assembly to prevent soggy dough.
💌 Save this recipe
We'll send you occasional emails from Cook2eatwell. Unsubscribe anytime.
Nutrition
The nutritional information above is computer generated and is only an estimate. There is no guarantee that it is accurate. This data is provided as a courtesy for informational purposes only.

Leave a Reply